Wireless control of IR devices through Z-Wave
Creating a virtual controller using iTach devices
iTach WiFi (iTach Flex WiFi and iTach WF2IR) devices are unsecured ad-hoc devices communicating with any Wi-Fi device.
- After connecting the power supply of the device, either through an adaptor or USB, you can see the available wireless networks and you can add the device into the list of devices.
- The Flex, WF2IR device has a unique MAC ID which is printed on the bottom label. For example if the MAC ID is 000C1E01B45C, then the name of the wireless network is ITACHFLEX000C1E01B45C.
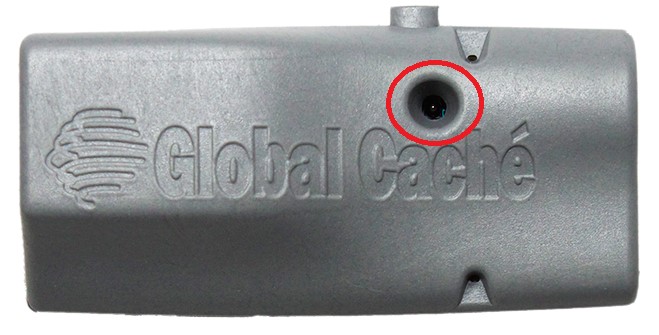
- The iTach Flex device supports WPS and can be started by holding the button on the side of the device for 4 seconds. The LED indicator will blink in an accelerated mode confirming the start of the WPS mode.
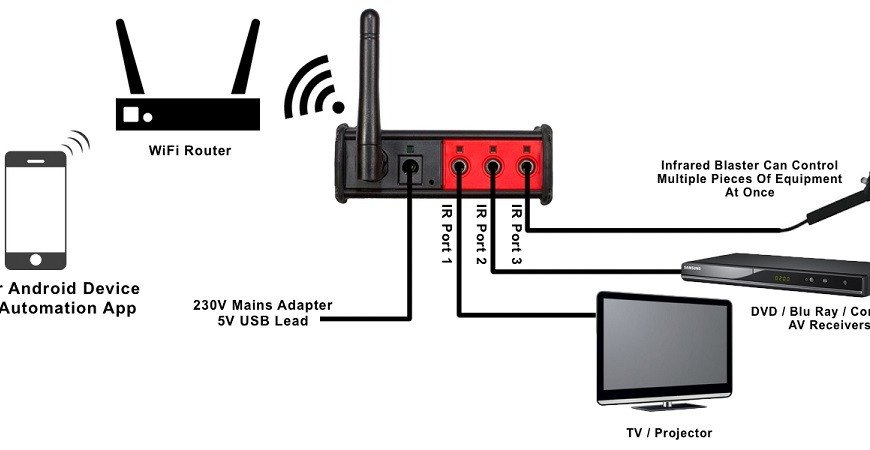
iTach IP2IR can be simply connected into your home network using an Ethernet cable.
Network configuration of devices
To find out the IP address of the device you have to download the iHelp application from the website
Start iHelp in a computer connected into the same network. iHelp follows the communication of the iTach device and displays its MAC ID and IP address in one minute. Set your device so that you select it from the offered list, and then push the right button in the Configure menu to display the iTach site in your browser. Select the iTach Network (network) site. If a password is required, select OK if no password had been entered before.
Set the necessary data such as IP Address, Gateway, Subnet Mask and SSID (network name). If you have a permitted DHCP protocol, the device allows to use this protocol, and it automatically sets the IP addresses.
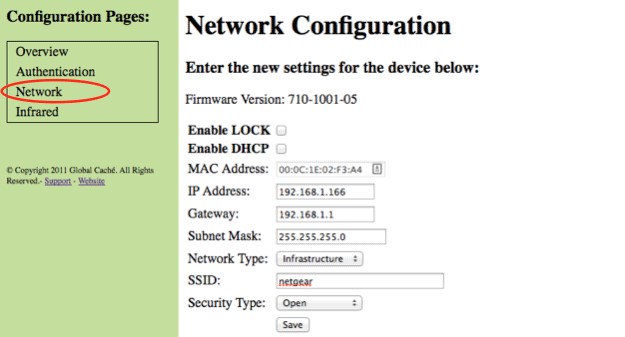
Fig. 1.1 Network settings
IR Learning (IR Codes learning)
The iTach device has the ability to learn IR codes. To use this ablity simply download the iLearn application from the website
http://www.globalcache.com/support
You can set the buttons of the controller using this programme.
- After starting the application you can set the correct IP address and the correct connector (applies for the devices WF2IR and IP2IR).

Fig. 1.2 Setting of the iLearn application
- After the setting put the controller into the distance of 5 cm from the device itself (e.g. point the iTach Flex controller to this LED IR receiver) and push the button that you want to use.
- If the command is carried out correctly you will hear a sound signal.
- The IR code is displayed in the programme window.
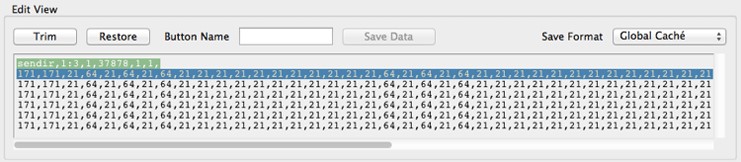
Fig. 1.3 Receiving the IR codes
- Then you can save the code, name the button, select the format of the IR code (Global Caché) and finally test the functionality.
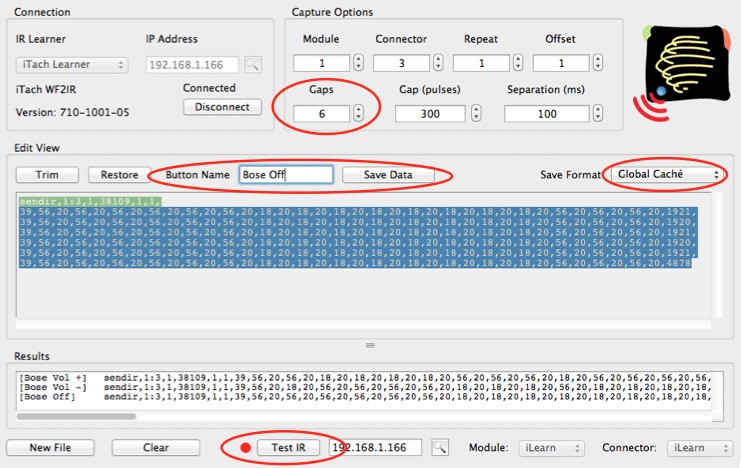
Obr. 1.4 Receiving the IR codes
Using iTach with Fibaro Home Center
Creating a virtual device
- On the Home Center webpage, in the menu, select Devices > Add Remove Devices.
- In the section Virtual devices select “Add“.
- Name the device.
- In the menu select Room.
- IP Address - Enter the IP address of the iTach device 192.168.1.166
- TCP Port enter 4998
- Push the icon “Save"
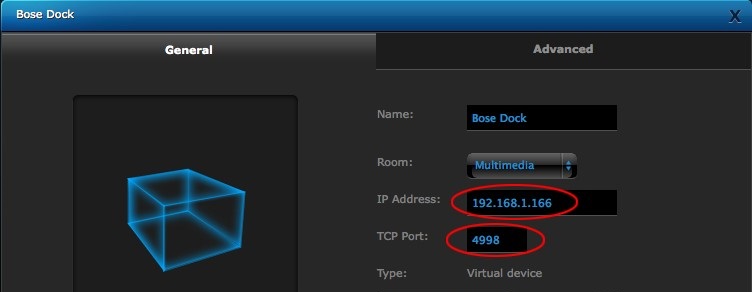
Fig. 2.1: Creating a virtual device
Creating the buttons
Example for the Play button
- Open the tab in the section “Advanced“.
- Lower on the tab you can find the section “Choose set of buttons“.
- Select “One button per line", it depends what layout of buttons of the virtual controller you want to have.
- Click on “Add set“.
- Click on the icon “Save“ on the right-hand side.
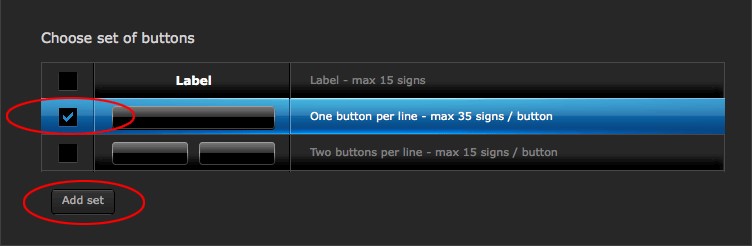
Fig. 2.2: Creating the buttons
Adding the IR codes
Now you have to take the IR control codes, that you can get from the iLearn application from the website
and to insert and use these codes in the virtual buttons of the device. The procedure is described above.
- The virtual device uses the Global Cache IR Control String, in the iLearn application select the Global Cache format.
- Enter the received code into the text editor, and make sure there are no gaps or line ends in it.
- Add “0x0D0x0A“ at the end of this line – it indicates the Home Center control unit that the line is ended and the command can be sent out.

Fig. 2.2: Ending of the IR codes
- In the section Virtual devices in “Advanced“ lower on the page you can see the button that has just been created.
- Name the button - for example “Play“.
- Select the column “String“ and “Wait for device response“.
- Insert the IR string “Play“ into the text field.
- Click on the icon “Save“ on the right-hand side.
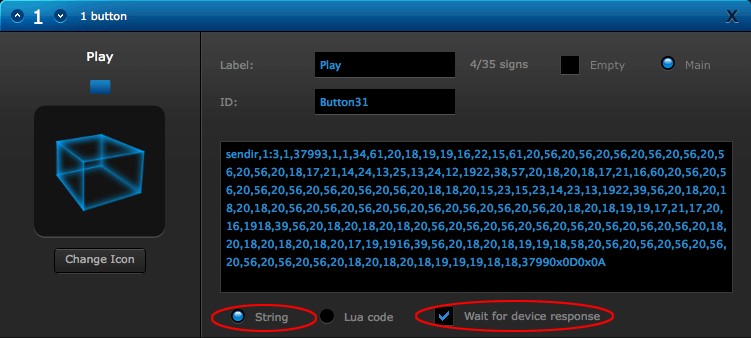
Fig. 2.3: Adding the IR code
- Create the other buttons for your virtual device..
- Make sure you have selected the column "Wait for device response“
- Select the column “String“ and “Wait for device response“, this step is very important.
Note: After adding all the buttons reset your control unit!
In Fig. 2.4 you can see an example of a virtual controller
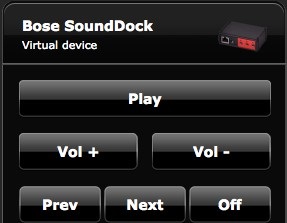
Fig. 2.4: Virtual controller
Now you can use the IR controlled appliances wirelessly through your tablet or mobile phone, or PC.
Related articles
How to control your air conditioning wirelessly via Z-Wave?
Inclusion of Remotec ZXT-120 to Fibaro Home Center 2

Configuration of SRT321 thermostat and the SSR 303 FIBARO relay
Configuration of the SRT321 thermostat and SSR 303 FIBARO relay
SECURE 7 DAY PROGRAMMABLE THERMOSTAT SET Integration into Fibaro...
Inclusion Programmable Termostat SCS317 into Fibaro System
How to log into account for remote access via smartphone
How to log into account for remote access via smartphone

How to make a account for remote access to Fibaro System
Registration, creation of a account and adjustment the remote access for Fibaro System.
Leave a CommentLeave a Reply
Blog categories
Blog search
Latest Comments

SmarterHOME
on Aqara Smart Radiator Thermostat E1 quick start...
Vomáčka Petr DiS.
on Aqara Smart Radiator Thermostat E1 quick start...
SmarterHOME Team
on Shelly devices "Pending connection" issue (FIX)

SmarterHOME Team
on Shelly devices "Pending connection" issue (FIX)

SmarterHOME Team
on Shelly devices "Pending connection" issue (FIX)

SmarterHOME Team
on SHELLY HomeKit Support (Open Source)
Vlada
on SHELLY HomeKit Support (Open Source)
- SMART SOLUTIONS
- About Z-Wave
- Information
- Blog
- Forum
- Brands


- Write us
- B2b
- Trainings
- Contacts
- DISCOUNTS
- Z-Wave Controllers
- Sensors and detectors
- Electrical meters
- Heating and Climate
- Switches and Dimmers
- IP Cameras
- Door Locks
- Wall Plugs
- Window and Blinds Control
- Multimedia Control
- Starter Kits and Bundles
- APPLE HOMEKIT
- Danfoss Link
- WiFi / LAN
- Zigbee
- Other products
- Gadgety
- Refurbished
- DISCOUNTS
4 Comments
james 12.06.2018 Reply
how to open itach home centerSmarterHOME 12.06.2018 Reply
Dear sir,please specify your question, we do not know what you mean.
You can also contact us via email or phone.
Thank you.
SmarterHOME
khalil 30.05.2018 Reply
can you send me more specification via e-mailSmarterHOME 31.05.2018 Reply
Dear sir,sure, we are sending you more information via email.
Please check.
Thank you.