Using Aeon Labs Minimote in Fibaro HC2
In this manual we will show you how to simply set the Aeon Labs Minimote driver as a secondary driver in the Fibaro Home Center 2 control unit.
The Aeon Labs Minimote device can be used as a separate Z-Wave controller and this means it can assign (associate) the particular Z-Wave devices to the functions of its buttons.
You can find more information on the hierarchy of the Z-Wave communication port in this article.
How to add Minimote into HC2 as a secondary controller?
- Push and hold down the Learn button on the Minimote controller for 3 seconds.
- In the HC2 control unit set the Learning mode to add the devices (Inclusion).
- During pairing the LED indicators blink on the Minimote controller.
- Wait until the process is completed - then the icon of the Minimote device is displayed in the Fibaro web interface.
Creating a LUA scene for Minimote
- In the Fibaro HC2 interface select the section Scenes.
- Then Add scene.
- Add scene in LUA.
- Enter the code mentioned above (modify it according to your needs and requirements).
- Name the scene and Save it.
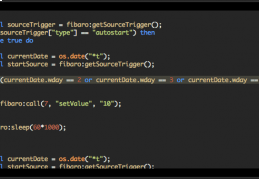
Explanation of the LUA code
In the LUA code it is necessary to set the ID of the Aeon Labs Minimote device (in code 687).
The meaning of the particular numbers of buttons in the LUA code (ButtonPressed).
- 1 – short push - upper left button
- 2 – long push - upper left button
- 3 – short push - upper right button
- 4 – long push - upper right button
- 5 – short push - lower left button
- 6 – long push - lower left button
- 7 – short push - lower right button
- 8 – long push - lower right button
LUA code
--[[
%% properties
687 sceneActivation
-- nastavte vase ID zariadenia Minimote miesto 687, najdeteho ked kliknete na nastavenia zariadenia
%% globals
--]]

local ButtonPressed = fibaro:getValue(687, "sceneActivation")
-- takisto treba zmenit ID miesto 687

if (tonumber(ButtonPressed) == 1) then
        fibaro:debug("MiniMote button 1 pressed")
        -- spusti sa scena s ID 11
	fibaro:startScene(11)

elseif (tonumber(ButtonPressed) == 2) then
	fibaro:debug("MiniMote button 2 pressed")
        -- naraz sa vypnu zariadenia s ID 580, 629, 678
	fibaro:call(580,"turnOff")
	fibaro:call(629,"turnOff")
	fibaro:call(678,"turnOff")

elseif (tonumber(ButtonPressed) == 3) then
	fibaro:debug("MiniMote button 3 pressed")

elseif (tonumber(ButtonPressed) == 4) then
	fibaro:debug("MiniMote button 4 pressed")

elseif (tonumber(ButtonPressed) == 5) then
	fibaro:debug("MiniMote button 5 pressed")

elseif (tonumber(ButtonPressed) == 6) then
	fibaro:debug("MiniMote button 6 pressed")
	fibaro:call(689, "turnOff")

elseif (tonumber(ButtonPressed) == 7) then
	fibaro:debug("MiniMote button 7 pressed")

elseif (tonumber(ButtonPressed) == 8) then
	fibaro:debug("MiniMote button 8 pressed")

else
	fibaro:debug("No response")

end
Removal (Exclusion) of Minimote from the Fibaro HC2 control unit
- Set the control unit into the Learning mode to remove the devices from the Z-Wave network (exclusion).
- Hold down the Learn button.
Factory Reset Minimote
- Hold down the Associate and Learn buttons until the LED indicators stop blinking (approximately 10 seconds).
Related articles

Fibaro HC2: LUA script to check the status of windows and doors
Short LUA script for Z-Wave controller Fibaro Home Center 2 for checking the door and window sensors when leaving the...
LUA Script: Battery check - Fibaro Home Center 2
A simple LUA script to check the status of battery devices.

Vera Edge - How to work with scenes and the Minimote controller
Creating a scene and controlling the scenes using the Minimote remote controller

Implementations and setting the device for the triggering of the Fibaro Swipe scenes using the LUA script.
Related products
Leave a CommentLeave a Reply
Blog categories
Blog search
Latest Comments

SmarterHOME
on Aqara Smart Radiator Thermostat E1 quick start...
Vomáčka Petr DiS.
on Aqara Smart Radiator Thermostat E1 quick start...
SmarterHOME Team
on Shelly devices "Pending connection" issue (FIX)

SmarterHOME Team
on Shelly devices "Pending connection" issue (FIX)

SmarterHOME Team
on Shelly devices "Pending connection" issue (FIX)

SmarterHOME Team
on SHELLY HomeKit Support (Open Source)
Vlada
on SHELLY HomeKit Support (Open Source)
- SMART SOLUTIONS
- About Z-Wave
- Information
- Blog
- Forum
- Brands


- Write us
- B2b
- Trainings
- Contacts
- DISCOUNTS
- Z-Wave Controllers
- Sensors and detectors
- Electrical meters
- Heating and Climate
- Switches and Dimmers
- IP Cameras
- Door Locks
- Wall Plugs
- Window and Blinds Control
- Multimedia Control
- Starter Kits and Bundles
- APPLE HOMEKIT
- Danfoss Link
- WiFi / LAN
- Zigbee
- Other products
- Gadgety
- Refurbished
- DISCOUNTS