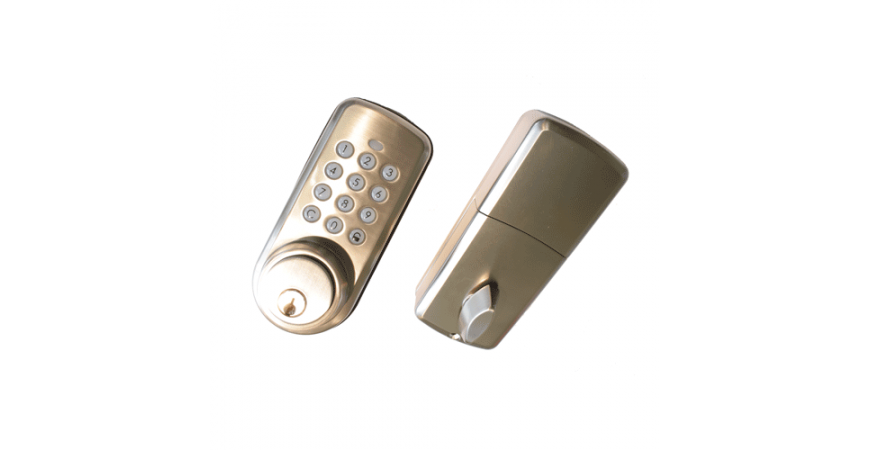
Fibaro HC2 - setting the Vision ZM1701 lock
We have a good news for the users of the Fibaro Home center 2 control unit, at last it is possible to fully use the Vision ZM1701 lock. To correctly set the Vision ZM1701 lock it is necessary to have the Fibaro Home Center 2 control unit because of the use of the LUA scripting language to set the PIN code to unlock the lock. In the Fibaro Home Center 2 control unit it is not possible to set the PIN code using the control unit because the LUA language is not available here.
Note: We recommend to pair the device with the control unit and to set the PIN code too.
Adding the Z-Wave wireless lock in the door (without a handle)P – Vision ZM1701
The procedure of adding devices in the Fibaro control units is known to every user. So simply follow the steps and click the Devices panel -> Add or remove devices and then it is necessary to check the Add in protected mode field if it is supported by the device -> Add.

The time interval is started, during which you can add the Z-Wave device. During this interval push C-8-8-8 on the device and if pairing does not start move the two largest parts of the lock.
Setting the PIN code using the LUA code
At the moment, the PIN code can be set by using the following LUA code. The device supports the setting of the PIN code in the range of 4-10 digits.
The necessary changes in the LUA script:
- line 6 – it is necessary to change the ID of the Z-Wave wireless lock on the door (without handle) – Vision ZM1701
- line 14 – change the PIN code 12340 – to your own PIN code
Then you must save this LUA script and start it in the debugging window you can see the progress. After you have started the scene you must wait for 15 seconds to implement the whole script and during these 15 seconds you should hear a peep.
LUA Script:
--[[
%% properties
%% events
%% globals
--]]
local ID = 1438 -- ID Zamku
fibaro:call(ID, "getUserCode", 1);
fibaro:sleep(5000)
--
local usersStatus = fibaro:getValue(ID, "userCodes");
print(usersStatus);
fibaro:sleep(5000)
-- 12340 je PIN - zmena
fibaro:call(ID, "setUserCode", "1", "Occupied", "12340", "");
fibaro:sleep(5000)
--
local usersStatus = fibaro:getValue(ID, "userCodes");
print(usersStatus);
Explanation of what is happening in the particular scene, see the figure below.
fibaro:call(ID, "getUserCode", 1); - This command makes accessible the 1st register for the entering of the 1st PIN Code.
local usersStatus = fibaro:getValue(ID, "userCodes"); - This command makes accessible the statutes of the registers. See the figure - it is possible to set up to 13 codes - in registers 0-12.
print(usersStatus); - Information of the status of registers - if they are available or not.
fibaro:call(ID, "setUserCode", "1", "Occupied", "12340", ""); - Entering the PIN code into the first register and setting the occupancy.

The setting of the PIN code for the wireless lock is similar to the setting of the RFID reader, see the link to the article in similar articles.
Related articles
Related products
Leave a CommentLeave a Reply
Blog categories
Blog search
Latest Comments

SmarterHOME
on Aqara Smart Radiator Thermostat E1 quick start...
Vomáčka Petr DiS.
on Aqara Smart Radiator Thermostat E1 quick start...
SmarterHOME Team
on Shelly devices "Pending connection" issue (FIX)

SmarterHOME Team
on Shelly devices "Pending connection" issue (FIX)

SmarterHOME Team
on Shelly devices "Pending connection" issue (FIX)

SmarterHOME Team
on SHELLY HomeKit Support (Open Source)
Vlada
on SHELLY HomeKit Support (Open Source)
- SMART SOLUTIONS
- About Z-Wave
- Information
- Blog
- Forum
- Brands


- Write us
- B2b
- Trainings
- Contacts
- DISCOUNTS
- Z-Wave Controllers
- Sensors and detectors
- Electrical meters
- Heating and Climate
- Switches and Dimmers
- IP Cameras
- Door Locks
- Wall Plugs
- Window and Blinds Control
- Multimedia Control
- Starter Kits and Bundles
- APPLE HOMEKIT
- Danfoss Link
- WiFi / LAN
- Zigbee
- Other products
- Gadgety
- Refurbished
- DISCOUNTS
2 Comments
Pavel Hulmák 20.12.2023 Reply
Dobrý den,snažím se změnit PIN kód z LUA kódu u klávesnice Philio PSK01, ale funkce setUserCode se neprovede, resp. provede se jen částečně. Když si následně zobrazím userCodes, vrátí "update: InProgress" u příslušného PINu. Nemáte s tím nějaké zkušenosti, resp. není tam nutné ještě nějaké potvrzení?
Je také možné, že změna PIN kódu u této klávesnice není z LUA scriptu povolena. Pokud ne, můžete mi doporučit jinou klávesnici, případně zámek s klávesnicé, kde je tato změna možná?
Děkuji,
P. Hulmák
SmarterHOME Team 03.01.2024 Reply
Dobrý deň,bohužiaľ s touto klávesnicou nemáme skúsenosť.
Skúste sa pozrieť na toto video tam to riešia s HC3 - https://rb.gy/9s5a6m
Pekný deň.
SmarterHOME