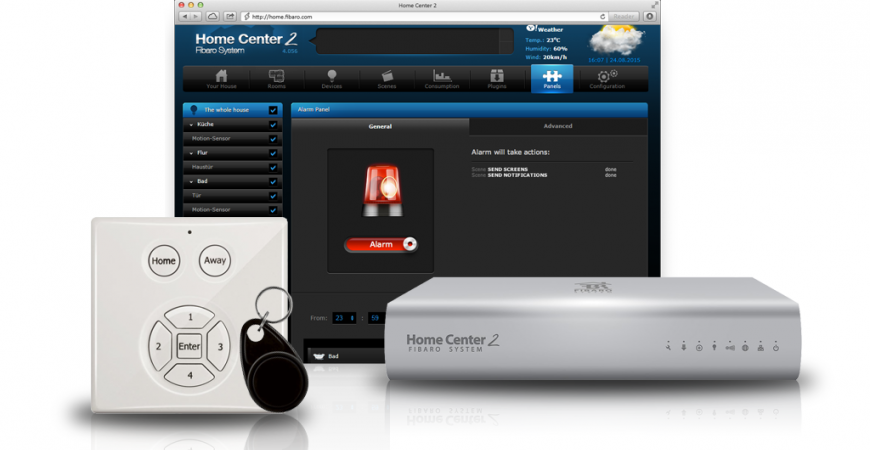
Zipato RFID and Fibaro HC2
Setting the RFID reader with the Fibaro HC2 control unit
Installation of the RFID reader
- Remove the back cover of the RFID reader.
- Insert the batteries.
- Start the "Learnign mode" to add a new Z-Wave device in the HC2 control unit.
- Push and hold down the tamper button for 1 second (or push more times).
- Let the pairing process to be completed..
- Then select "Other devices".

After the successful pairing of the RFID reader with the Home Center 2 control unit it is necessary to set the RFID reader so that it is able to recognize the correct RFID key case and to set the respective PIN code, there can be only one or more codes.
Setting the RFID Tag key
First it is important to find out the code (chain) of the RFID tag / PIN Code. To do it just push the Home or Away button and put the RFID Tag key to the RFID reader or enter PIN Code and confirm by Enter button. In the dialogue window of the Fibaro system this chain is displayed and it looks like this [143,56,144,13,1,32,2,128,0,0]. Try to remember this chain.
For PIN Code 1234, the string loks like this [49,50,51,51,0,0,0,0,0,0].

Then it is necessary to create a new LUA scene and enter the code into it.
LUA Script 1
This script frees 5 places in the register to write 5 various chains of the RFID key cases. After the modification of the LUA script it is necessary to run this scene. Then it is necessary to wake up the RFID reader. The Wake-Up of the RFID reader is dine by using the Home or Away buttons and by putting the RFID key case or by pushing the button tamper under the cover.
--[[
%% properties
%% events
%% globals
--]]
local ID = 72 -- ID RFID Citacky
fibaro:call(ID, "getUserCode", 1);
fibaro:call(ID, "getUserCode", 2);
fibaro:call(ID, "getUserCode", 3);
fibaro:call(ID, "getUserCode", 4);
fibaro:call(ID, "getUserCode", 5);
LUA Script 2
This script will write you if the first five places in the register to write 5 different chains of the RFID key case are free. After the modification of the LUA script and its saving it is necessary to run this scene.You can see this in the debugging window.
[DEBUG] 15:55:26: [{"id":0,"name":"","status":"Available"},{"id":1,"name":"","status":"Available"},{"id":2,"name":"","status":"Available"},{"id":3,"name":"","status":"Available"},{"id":4,"name":"","status":"Available"},{"id":5,"name":"","status":"Available"},
--[[
%% properties
%% events
%% globals
--]]
local ID = 72 -- ID RFID Citacky
local usersStatus = fibaro:getValue(ID, "userCodes");
print(usersStatus);
LUA Script 3
Using this script you can set a specific RFID key case for the first user (1st place in the register). In the scene you must change the "chain" of the RFID key case. After the modification of the LUA script and its saving it is necessary to run this scene. Then it is necessary to wake up the RFID reader. The Wake-Up of the reader is carried out by pushing the Home or Away button and by putting the RFID key case or by pushing the tamper button under the cover.
--[[
%% properties
%% events
%% globals
--]]
local ID = 72 -- ID RFID Citacky
fibaro:call(ID, "setUserCodeDec", 1, "143,40,31,11,1,32,2,128,0,0")
-- Rovnako je mozne pridat dalsiu klucenku
-- fibaro:call(ID, "setUserCodeDec", 2, "143,56,144,13,1,32,2,128,0,0")
Setting the PIN code on the RFID reader
Setting of the PIN code is in fact very similar to the setting of the RFID key case. It is necessary to gradually run all the LUA scripts.
LUA Script 1
Tento skript uvoľní 5 miest registra pre zápis 5 rôznych reťazcov. Po upravení Lua skriptu a jeho uložení je potrebné Spustiť túto scénu. Následne je potrebné spraviť wake up RFID čítačky. Wake up RFID čítačky sa robí stlačením tlačidla Home alebo Away a priložením RFID kľúčenky alebo stačením tamper tlačidla pod krytom.
--[[
%% properties
%% events
%% globals
--]]
local ID = 72 -- ID RFID Citacky
fibaro:call(ID, "getUserCode", 1);
fibaro:call(ID, "getUserCode", 2);
fibaro:call(ID, "getUserCode", 3);
fibaro:call(ID, "getUserCode", 4);
fibaro:call(ID, "getUserCode", 5);
LUA Script 2
This script will write you if the first five places in the register to write 5 different chains of the RFID key case are free. After the modification of the LUA script and its saving it is necessary to run this scene.You can see this in the debugging window.
[DEBUG] 15:55:26: [{"id":0,"name":"","status":"Available"},{"id":1,"name":"","status":"Available"},{"id":2,"name":"","status":"Available"},{"id":3,"name":"","status":"Available"},{"id":4,"name":"","status":"Available"},{"id":5,"name":"","status":"Available"},
--[[
%% properties
%% events
%% globals
--]]
local ID = 72 -- ID RFID Citacky
local usersStatus = fibaro:getValue(ID, "userCodes");
print(usersStatus);
LUA Script 3
Using this script you can set a specific PIN code for the third user (3rd place in the register). In the scene you must change the "PIN code" of the RFID key case. After the modification of the LUA script and its saving it is necessary to run this scene. Then it is necessary to wake up the RFID reader. The Wake-Up of the reader is carried out by pushing the Home or Away button and by putting the RFID key case or by pushing the tamper button under the cover.
--[[
%% properties
%% events
%% globals
--]]
local ID = 72 -- ID RFID Citacky
fibaro:call(ID, "setUserCodeDec", 3, "49,50,51,52,0,0,0,0,0,0"); -- prve 2 cisla v registri su obsadene RFID klucenkami, preto je tam nastavena 3
LUA Script for starting the scenes
After the definition of the RFID key case and the PIN code you can use this LUA script to start the scenes that enable/disable the alarm in the particular devices. It is necessaryto make a change in line 3, to change the number 1324 to the ID of your RFID reader.
--[[
%% properties
1324 value
%% events
%% globals
--]]

local trigger = fibaro:getSourceTrigger()
local rfid_value_status = ''

Debug = function ( color, message )
  fibaro:debug(string.format('<%s style="color:%s;">%s', "span", color, message, "span"))
end
if (trigger['type'] == 'property') then
 fibaro:debug('RFID Scena sa spustila.')
 local rfid_ID = tonumber(trigger['deviceID'])
 local rfid_value = tonumber(fibaro:getValue(rfid_ID, 'value'))
  if (rfid_value == 1) then
    rfid_value_status = 'Away'
    Debug('red', 'Status ' ..rfid_value_status.. ' nastaveny.')
    fibaro:startScene(12) --spustenie sceny na aktivaciu alarmu
  elseif (rfid_value == 0) then
    rfid_value_status = 'Home'
    Debug('green', 'Status ' ..rfid_value_status.. ' nastaveny.')
    fibaro:startScene(11) --spustenie sceny na deaktivaciu
  end
end
Related products
Leave a CommentLeave a Reply
Blog categories
Blog search
Latest Comments

SmarterHOME
on Aqara Smart Radiator Thermostat E1 quick start...
Vomáčka Petr DiS.
on Aqara Smart Radiator Thermostat E1 quick start...
SmarterHOME Team
on Shelly devices "Pending connection" issue (FIX)

SmarterHOME Team
on Shelly devices "Pending connection" issue (FIX)

SmarterHOME Team
on Shelly devices "Pending connection" issue (FIX)

SmarterHOME Team
on SHELLY HomeKit Support (Open Source)
Vlada
on SHELLY HomeKit Support (Open Source)
- SMART SOLUTIONS
- About Z-Wave
- Information
- Blog
- Forum
- Brands


- Write us
- B2b
- Trainings
- Contacts
- DISCOUNTS
- Z-Wave Controllers
- Sensors and detectors
- Electrical meters
- Heating and Climate
- Switches and Dimmers
- IP Cameras
- Door Locks
- Wall Plugs
- Window and Blinds Control
- Multimedia Control
- Starter Kits and Bundles
- APPLE HOMEKIT
- Danfoss Link
- WiFi / LAN
- Zigbee
- Other products
- Gadgety
- Refurbished
- DISCOUNTS
5 Comments
Stanislav Vrhel 30.04.2018 Reply
Dobrý den,lze na zipatu spustit zvukovou notifikaci, že je zakódováno?
Děkuji s pozdravem Vrhel
SmarterHOME 30.04.2018 Reply
Dobrý deň,áno, príklad nastavenie sa nachádza na našom fóre tu:
https://smarterhome.sk/sk/forum/topic/nastavenie-zvukovej-notifikacie-pri-zakodovani-2.html
Michal 02.02.2018 Reply
ten váš skript 3 by ste fakt mohli upravit...SmarterHOME Team 05.02.2018 Reply
Dobrý deň,v našom blogu sme vychádzali s oficiálnych informácií od spoločnosti Fibaro uvedených na fóre:
https://forum.fibaro.com/index.php?/topic/22280-zipato-rfid/
Ďakujeme za upozornenie, ktoré pomôže aj ostatným používateľom.
Jakub 11.10.2016 Reply
LUA skript č. 3 pro nastavení kódu na klávesnici mi nefunguje. Kód na klávesnici jsem musel zadat stejně jako v případě RFID čtečky.Ta Zipato klávesnice totiž po zadání kódu na klávesnici na klávesnici vyšle podobný kód, ne-li stejný kód jako RFID tag.