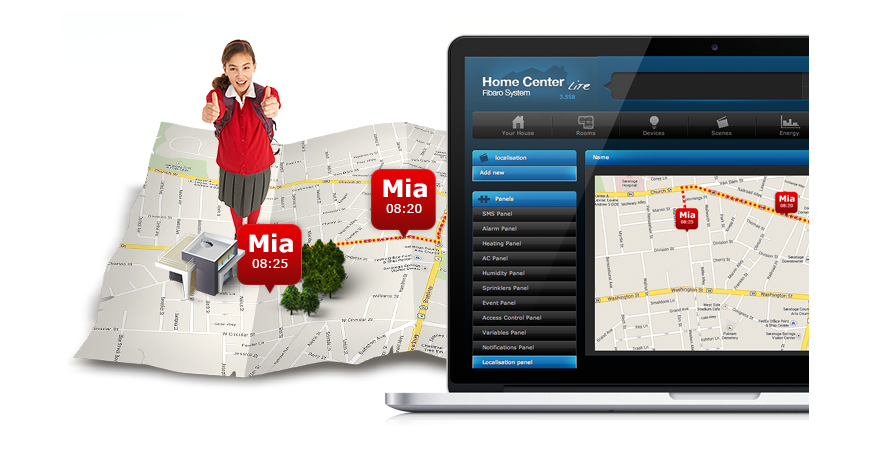
Fibaro GPS Scene
Instructions for creating a scene in the Fibaro interface for both types of control units from the Fibaro company that is run on the basis of the GPS location.
! When using this scene it is necessary to run the mobile data connection and GPS. In the manual you can find a model example which you can modify according to your own needs !
Step 1 - Creating a user account
At the beginning I recommend to create a new user account in the Fibaro interface that will be used in one mobile device to avoid collision situations in determining positions. You should set which devices/scenes or rooms it can use. After the creation of scenes in Step 6 it is good to assign the usage of these scenes to the created user.
Then set how often the Fibaro system should ask for the GPS position of the mobile device. (I leave the choice to the user; the smaller the interval is the more frequently the location is sent but this affects the battery consumption).
Of course, do not forget to save the settings.

Step 2 - Setting the GPS location of the control unit
Then I recommend to set the location of the house (according to the GPS coordinates) if you have not configured this setting yet to synchronize the time and weather information.
You can be inspired by the figure and change the GPS coordinates to your desired location.
Do not forget to save the settings.

Step 3 - Creating a location used in the scenes with the GPS coordinates
In the localization panel you can create a place with the GPS coordinates that you will use in the scene. It is necessary to enter the GPS coordinates of the locations and to name them for easy use in the scenes.

Step 4 - Creating a variable used in the scenes
You can create a variable in the variables panel. The variable will be used to indicate the status whether the user is at home (1) or away from home (0). It is based on the Boolean logic.
At home = 1 - the user is near the location of the house
At home = 0 - the user is away from home
This variable will be overwritten by the scenes controlled by GPS and on the basis of this variable it is possible to create also other scenes, e.g. if the user is away from home => variable At home = 0 - all sensors are set into the position ARMED (activated status).
Do not forget to save the settings.

Step 5 - Creating a notification (not necessary but can be used for checks)
In the notification panel you can easily create Push notifications that will warn you when a scene starts to run, and they will inform you if the user is at home or away from home.

Step 6 - Creating block scenes
After the completion of the pre-set settings you can start to create scenes. Select the creation of a new block scene.

Arriving home
The block scene for arriving home and the scene may look like this. If the mobile device gets close to the area, e.g. 50m from the place indicated by the GPS coordinates, a scene starts to run and it switches on a socket, sends out a Push notification (created in Step 5) that the selected user is at home. The variable At home is set to 1.

Leaving home
The block scene for leaving home may look like this. If the mobile device leaves the selected area, e.g. 50m from the place indicated by the GPS coordinates, a scene starts to run, it switches off the socket, sends out a Push notification (created in Step 5) that the selected user is away from home. The variable At home is set to 0.

Step 7 - Setting the mobile application
In the mobile application it is necessary to change the data for the local login of the user to the data for the newly created user. Then you must change the Location accuracy and the Keep awake setting to prevent sleep mode of the application.
Similarly, if you use some Task Killer in your smartphone it is necessary to make an exception for the Fibaro application to run in the background.
After the update of the settings and the granting of rights to be able to use the new scenes it is necessary to restore the data connection.

Step 8 - Granting the rights to the new user to be able to use the created scenes
It is neccessary to grant rights to the new user so he is able to use and see the GPS scenes. You can see the procedure in the figure below.

Step 9 - Monitoring the GPS location of the user
You can check the sending of the GPS information in the Fibaro system in the following way. In the Your house section in the left panel the Family menu is displayed, there you should select the user, in our case "gps".


Conclusion - Functionality test
At the end it is necessary to verify the functionality of the created scenes. If they do not work try to check the settings, either in the Fibaro web interface or in the Fibaro mobile application.
Tip: When testing, try to restore the data connection in the mobile application, or completely restart the mobile application.
Related products
Leave a CommentLeave a Reply
Blog categories
Blog search
Latest Comments

SmarterHOME
on Aqara Smart Radiator Thermostat E1 quick start...
Vomáčka Petr DiS.
on Aqara Smart Radiator Thermostat E1 quick start...
SmarterHOME Team
on Shelly devices "Pending connection" issue (FIX)

SmarterHOME Team
on Shelly devices "Pending connection" issue (FIX)

SmarterHOME Team
on Shelly devices "Pending connection" issue (FIX)

SmarterHOME Team
on SHELLY HomeKit Support (Open Source)
Vlada
on SHELLY HomeKit Support (Open Source)
- SMART SOLUTIONS
- About Z-Wave
- Information
- Blog
- Forum
- Brands


- Write us
- B2b
- Trainings
- Contacts
- DISCOUNTS
- Z-Wave Controllers
- Sensors and detectors
- Electrical meters
- Heating and Climate
- Switches and Dimmers
- IP Cameras
- Door Locks
- Wall Plugs
- Window and Blinds Control
- Multimedia Control
- Starter Kits and Bundles
- APPLE HOMEKIT
- Danfoss Link
- WiFi / LAN
- Zigbee
- Other products
- Gadgety
- Refurbished
- DISCOUNTS