Integration of IP cameras into the Fibaro interface
To integrate the IP camera into the Fibaro system, it is basically necessary that the IP camera supports the following:
- transfer of still images (JPEG) through HTTP
- transfer of dynamic images (MJPEG) through HTTP
- access to an image with or without the authentication HTTP Basic
The first step is to find the URLs for JPEG and MJPEG transfers through HTTP. The URLs are then inserted into the Fibaro interface. The URLs differ from the particular camera manufacturer and model and can be found in the manuals, or sometimes in the advanced settings in the web interface of the camera itself.
The Fibaro system currently does not support video transmission in the following formats and protocols:
- RTSP
- H.264
- HTTP Digest
Integration of the camera into Fibaro
In the Fibaro interface, the IP cameras can be added in many ways.
Adding the camera using the tab Add-ins
One of the methods is using the tab Add-ins where you need to install a specific add-in for a specific camera model. This method is limited to specific models and IP camera brands. If your IP camera is not listed there, go to the other method.
Procedure:
- Open the tab Add-ins
- Click the option Available -> Cameras -> search for your camera brand (e.g. Vivotek) -> click Install.
- Click Free of charge -> Add -> Advanced
- Then it is necessary to fill in the IP address of the camera, the user name, the password for the login to the camera (password)
- The URLs for the JPEG and MJEPG stream should be pre-filled
- Save the settings and verify the activity
Adding the camera using the tab Devices
Another method to add the IP camera int the Fibaro interface is the tab Devices. Click Add or remove devices. In the section Cameras to be added click the option Add. Then it is possible to name the IP camera (Name), place it into a room (Room) and select Camera model. If you do not find the brand of your camera, select Other model.
- If the brand of your camera is in the list, the URLs for the JPEG and MJPEG transfer will be automatically filled in.
- If the brand of your camera is not in the URLs list for the JPEG and MJPEG transfer you need to fill it in manually.
Then in the Advanced settings it is necessary to fill in the following:
- User = user name to access the IP camera
- Password = login password to access the IP camera
- IP address = the IP address of the IP camera
- JPG path = the URL for the transfer of a still image (JPEG) through HTTP
- MJPG path = the URL for the transfer of a dynamic image (MJPEG) through HTTP
- If your camera is adjustable, fill in also the commands for the movements in LEFT, RIGHT, UP, DOWN, STOP
URLs for the cameras HikVision
- JPG path = Streaming/Channels/102/picture
- MJPG path = http://login:password@IPadresa/Streaming/channels/2/httppreview
URLs for the video door-keeper DoorBird
- JPG path = /bha-api/image.cgi
- MJPG path = /bha-api/video.cgi
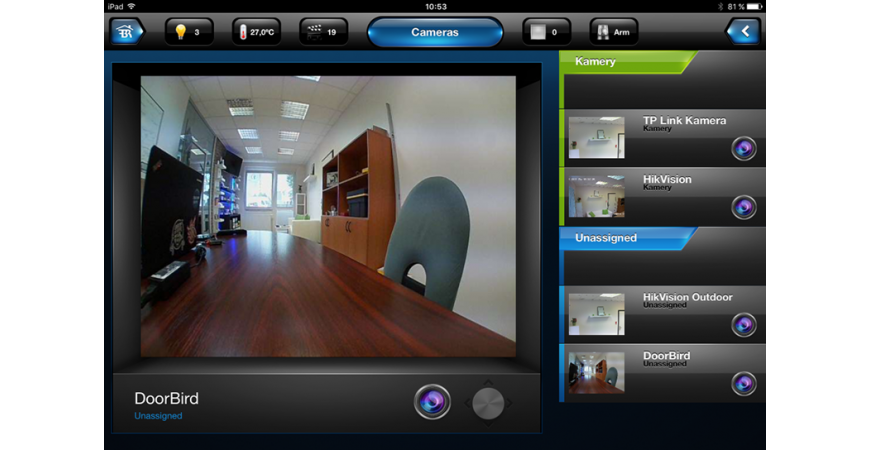
Example of the IP camera integration TP Link

Related products
Leave a CommentLeave a Reply
Blog categories
Blog search
Latest Comments

SmarterHOME
on Aqara Smart Radiator Thermostat E1 quick start...
Vomáčka Petr DiS.
on Aqara Smart Radiator Thermostat E1 quick start...
SmarterHOME Team
on Shelly devices "Pending connection" issue (FIX)

SmarterHOME Team
on Shelly devices "Pending connection" issue (FIX)

SmarterHOME Team
on Shelly devices "Pending connection" issue (FIX)

SmarterHOME Team
on SHELLY HomeKit Support (Open Source)
Vlada
on SHELLY HomeKit Support (Open Source)
- SMART SOLUTIONS
- About Z-Wave
- Information
- Blog
- Forum
- Brands


- Write us
- B2b
- Trainings
- Contacts
- DISCOUNTS
- Z-Wave Controllers
- Sensors and detectors
- Electrical meters
- Heating and Climate
- Switches and Dimmers
- IP Cameras
- Door Locks
- Wall Plugs
- Window and Blinds Control
- Multimedia Control
- Starter Kits and Bundles
- APPLE HOMEKIT
- Danfoss Link
- WiFi / LAN
- Zigbee
- Other products
- Gadgety
- Refurbished
- DISCOUNTS
3 Comments
esentia 22.12.2023 Reply
"Fantastic insights into the seamless integration of IP cameras into the Fibaro interface! This blog post provides a clear and comprehensive guide, emphasizing the enhanced capabilities and convenience this integration brings. It's great to see how technology is evolving to create a more integrated and streamlined experience for users. A must-read for anyone looking to optimize their smart home setup. Kudos to the author for breaking down the intricacies of IP camera integration with Fibaro!"SmarterHOME Team 03.01.2024 Reply
Thanks for positive comment.We appreciate it.
SmarterHOME Team
esentia 20.09.2023 Reply
excellent post