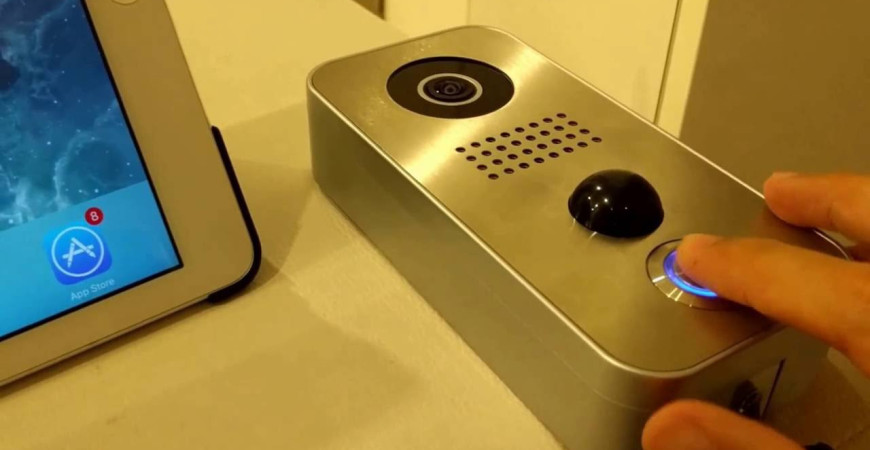
This article will be used for the integration of video door-keepers (Intercomm) DoorBird D101 an DoorBird D101S.
After the initial setting of the video door-keeper using the application DoorBird it will be available for:
- Link to Google Play for Android
- Link to App Store for iOS
Transfer of videos from the device DoorBird into the Fibaro interface
- The video door-keeper must be connected to the internet according to the instructions through Wi-Fi or POE.
- You must create a user account (not an admit account) that the Fibaro control unit will use to log into DoorBird.
- Open the Fibaro system.
- Open the tab Devices -> Add or remove devices -> Camera to be added -> Add
- Then you need to fill in the IP address of the camera, the user name and password. Withe the video door-keeper DoorBird the procedure is not standard.
- The rows User and Password must be left empty. The row IP address must be filled in as follows user_name:login_password@IP_address_DoorBird (e.g. ggabcd0000:4xxxXxxx5X@192.168.0.186 )
- The field JPG path is filled in with /bha-api/image.cgi
- The filed MJPG is filled in with /bha-api/video.cgi
- Do not forget to save it.
- You can see these in the figure below.

Control of the relay and IR backlight switching from Fibaro HC2/HCL using a virtual device
- Log into the Fibaro system.
- Open the tab Devices -> Add or remove devices -> Import virtual device.
- Select the correct file containing the virtual device for DoorBird.
- Fill in the IP address for the video door-keeper DoorBird. If the TCP port has not been set, set it to 80.
- On the tab Advanced it is necessary to modify the string behind the command GET. It is underlined with red in the figure below.
- The underlined string contains the login data encoded into the format base64 in the form login:password. Using this online tool https://www.base64encode.org/ encode your login data for DoorBird and insert them instead of the underlined string.
- An example of login data ggabcd0000:4xxxXxxx5X, the encoded data in the format base64 are as follows Z2dhYmNkMDAwMDo0eHh4WHh4eDVY.
- After you have inserted you login data into the virtual device you should be able to control the opening of the doors and the IR backlight of the camera using the particular buttons.
- Do not forget to save the changes.
- You can see these in the figure below.

Finding the ID of the mobile device - it will be used in the scenes LUA
Then you should find the ID of the mobile device, where you want to send the Push notifications. In the settings of the FIBARO device and on the tab Access control, copy the name of the device where you want to send the notifications. Then open a new window in the browser and insert the following link http://IP_adresa_HC2/api/devices , then find the name of the device (ctrl+f), that you copied before and you will see the ID of the mobile device.


Note: Write down the ID of the mobile device, you will need it in the scripts LUA.
Triggering of the Fibaro scene using the motion detection in the device DoorBird
To use the built-in motion sensor of the device DoorBird to trigger scenes in Fibaro, insert the following link into your web browser, of course, with edited parts that are marked with bold.
http://prihlasovacie_meno_DoorBird:prihlasovacie_heslo_DoorBird@IP_adresa_DoorBird/bha-api/notification.cgi?url=http://IP_adresa_Fibaro/api/sceneControl?id=ID_sceny_Fibaro%26action=start&user=prihlasovacie_meno_Fibaro&password=prihlasovacie_heslo_Fibaro&event=motionsensor&relaxation=120&subscribe=1
The value relaxation=120 in the URL defines the interval during which, after the detection of a movement, the motion sensor does not respond to a movement, the lowest possible value is 10 seconds.
The scene, e.g. ID 154, can trigger a scene after a movement has been detected, that will send you a notification the device DoorBird has responded to a movement. You can find the ID of the scene in the URL if the scene is opened in the Fibaro system.
You can see an example of such scene LUA below, of course, you can customize the scene :
--[[
%% properties
%% events
%% globals
--]]
--- Motion sensor DOORBIRD
local Doormotion = "Doormotion"
-- 1668 is the ID smart of the device where the push notifications are sent, replace it with your ID as you have found it above
fibaro:call(1668, "sendPush","Doorbird detected motion!")
fibaro:setGlobal(Doormotion,"1")
fibaro:sleep(3000) -- the lock is opened for 3 seconds
fibaro:setGlobal(Doormotion,"0")
Note: The triggered scenes are not necessarily only scenes UA but also scenes created with graphic blocks.
Triggering of a Fibaro scene in case a command to open the door is sent from the device DoorBird
If you want to monitor if the door has been opened using the application DoorBird or using a virtual device in the Fibaro interface and to use this information to trigger scenes in the Fibaro interface or only to know if someone has opened the door, insert the following link to the web browser, of course, with edited parts that are marked with bold.
http://prihlasovacie_meno_DoorBird:prihlasovacie_heslo_DoorBird@IP_adresa_DoorBird/bha-api/notification.cgi?url=http://IP_adresa_Fibaro/api/sceneControl?id=ID_sceny_Fibaro%26action=start&user=prihlasovacie_meno_Fibaro&password=prihlasovacie_heslo_Fibaro&event=dooropen&subscribe=1
The scene, e.g. ID 153, in case a command has been sent to open the door, can trigger a scene that sends you a notification that the device DoorBird has opened the door. You can find the ID of the scene in the URL if the scene is opened in the Fibaro system.
You can see an example of such scene LUA below, of course, you can customize the scene :
--[[
%% properties
%% events
%% globals
--]]
-- Opening the door DOORBIRD
local Dooropen = "Dooropen"
-- 1668 is the ID smart of the device where the push notifications are sent, replace it with your ID as you have found it above
fibaro:call(1668, “sendPush”,”Doorbird the door has been opened!")
fibaro:setGlobal(Dooropen,"1")
fibaro:sleep(3000)
fibaro:setGlobal(Dooropen,"0")
Note: The triggered scenes are not necessarily only scenes UA but also scenes created with graphic blocks.
Triggering a Fibaro scene in case the doorbell is pushed in the device DoorBird
To use the pushing of the button in the device DoorBird to trigger scenes in Fibaro, insert the following link into your web browser, of course, with edited parts that are marked with bold.
http://prihlasovacie_meno_DoorBird:prihlasovacie_heslo_DoorBird@IP_adresa_DoorBird/bha-api/notification.cgi?url=http://IP_adresa_Fibaro/api/sceneControl?id=ID_sceny_Fibaro%26action=start&user=prihlasovacie_meno_Fibaro&password=prihlasovacie_heslo_Fibaro&event=doorbell&subscribe=1
The scene, e.g. ID152, in case a button has been pushed in the device DoorBird, can trigger a scene that sends you a notification that someone is ringing to the device DoorBird, the scene can, for example, to automatically open a door. You can find the ID of the scene in the URL if the scene is opened in the Fibaro system.
You can see an example of such scene LUA below, of course, you can customize the scene :
--[[
%% properties
%% events
%% globals
--]]
--- DOORBIRD doorbell
local Doorbell = "Doorbell"
-- 1668 is the ID smart of the device where the push notifications are sent, replace it with your ID as you have found it above
fibaro:call(1668, “sendPush”,”Doorbird doorbell!")
fibaro:setGlobal(Doorbell,"1")
fibaro:sleep(3000)
fibaro:setGlobal(Doorbell,"0")
Note: The triggered scenes are not necessarily only scenes UA but also scenes created with graphic blocks.
Using the function Video Gate in the Fibaro system
At the beginning it is necessary to have, for example, some unnecessary channel from the relay module, e.g. Fibaro Double Switch 2. The channel is switched according to the scene defined above in the section -Triggering a Fibaro scene, if the doorbell button is pushed in the device DoorBird. The switching of the relay is used as an action to trigger the function of the video gate in the Fibaro interface, and each user will be automatically sent a notification, after the doorbell button on the device DoorBird has been pushed, that someone is at the door.
Note: The disadvantage of this solution is that no sound is transferred and it is not possible to talk to the guest. For this purpose, you should use the official application DoorBird.
Therefore, it is necessary to edit this scene so that it switches the channel on the relay. An example of this edited scene looks like this:
--[[
%% properties
%% events
%% globals
--]]
--- DOORBIRD doorbell
  local Doorbell = "Doorbell"
-- 1668 is the ID smart of the device where the push notifications are sent, replace it with your ID as you have found it above
fibaro:call(1668, “sendPush”,”Doorbird doorbell!")
fibaro:call(1641,”turnOn”) -- switching of the relay Fibaro
fibaro:setGlobal(Doorbell,"1")
fibaro:sleep(3000)
fibaro:call(1641,”turnOff”) -- disconnecting the relay Fibaro
fibaro:setGlobal(Doorbell,"0")
In the Fibaro system open the Tabs -> Interconnected devices -> Enter -> Video Gate
There you should configure the camera that will monitor the door Camera -> DoorBird
Input for the doorbell button -> Select the unnecessary channel from the relay module.
After that, if someone pushed the doorbell button on the device DoorBird, each user will be sent a push notification, and if the Fibaro application is running, the video gate is immediately triggered.
Translation coming soon !


Ha******* 03.12.2020
Hello when I try to enter the URL for the doorbell integration with my own login and password it gives me a "401 Unauthorized" error, do you have any solutions for this issue?Sm********* **am 07.12.2020
Hello,you are probably entering bad login data either for DoorBird or FIBARO.
Have a nice day.
SmarterHOME Team
Ju*** ***la 12.10.2020
Dobrý deň,je možné použiť tento návod aj pre integrácu s HC3? Testovali ste to?
Vďaka
Sm********* **am 13.10.2020
Dobrý deň,ďakujeme za dotaz.
Čo sa týka Virtuálneho zariadenia, tak je dostupná QuickApp pre HC3 - https://marketplace.fibaro.com/items/doorbird-1c8e7325-0e1a-4f03-b26c-378ecf34c827
Spustenie scény HC3 na základe stlačenia tlačidla / otvorenia zámku na Doorbirde nie je možné zatiaľ v HC3.
Pekný deň.
Ju*** ***la 24.08.2021
Dobrý deň,máte prosím nejaký update ohľadne možnosti spustenia scény na základe stlačenia tlačidla na Doorbirde?
Vďaka,
Juraj Kugla
Ju*** ***la 18.05.2021
Dobrý deň,nemáte náhodou nejaké nové info ohľadom integrácie DoorBird a HC3? Konkrétne ma zaujíma spúšťanie scén pri stlačení tlačítka na Doorbirde. Neviete, či to má Fibaro v pláne pripraviť?
Vďaka,
Juraj Kugla
Sm********* **am 15.10.2021
Dobrý deň,samozrejme je to realizovať - viac si prečítate -
https://forum.fibaro.com/topic/28914-doorbird-intercom-integration/page/2/
https://forum.fibaro.com/topic/50144-external-http-call-with-hc3/#comment-206895
Pekný deň.
SmarterHOME
go******** 14.05.2019
Is there an option when the push button is triggered it can send a google speak notificationSm********* **am 14.05.2019
Hello,you can try this:
https://forum.fibaro.com/files/file/180-text-to-speech-android-phonetablet/
Have a nice day.
To*** 10.03.2019
Dobry den, je mozne s tymto videovratnikom otvarat aj branicku pomocou smartfonu?Sm********* **am 11.03.2019
Dobrý deň,ďakujeme za podnet.
Áno, videovrátnik DoorBird konkrétne model spomínaný v článku má 1 bezpotenciálový kontakt, ktorý dokáže spínať 1A pri maximálnom napätí 24V DC alebo AC.
DoorBird funguje autonómne aj bez riadiacej jednotky, stačí Vám na jeho použitie jeho natívna aplikácia.
Napájať sa dá pomocou 15V DC adaptéra, ktorý je pribalený alebo cez POE IEEE 802.3af.
Na pripojenie do internetu je možné využiť WiFi alebo LAN kábel.
Pekný deň.
Se**** 12.04.2018
Hello,Thank you very much for the tutorial.
I have a question, how can I get a notification from Fibaro when they push the doorbird button? I can not do it.
Thank you,
Sm********* **am 15.04.2018
Hello,you need to use right ID of you smartphone where you want to get push notification, like it is mention in LUA scene above.
Have a nice day.
Do****** 27.01.2018
hi sir,i follow(https://smarterhome.sk/sk/blog/integracia-videovratnika-doorbird-do-rozhrania-fibaro_96.html ) document,step by step procedure its not working.could you please guide me with video tutorial.Sm********* **am 31.01.2018
You can try use %40 instead of @ sign in Fibaro login.But probably, there is an issue with using @ sign in username, so the best solution would be create the new user with username not using @ sign in Fibaro HC2. Do not forget assign the scenes and devices to new user of HC2. You can allow the new user to use all scenes or devices or just some of them. Then try again like this:
http://login_DoorBird:password_DoorBird@IP_address_DoorBird/bha-api/notification.cgi?url=http://IP_address_Fibaro/api/sceneControl?id=ID_scene_Fibaro%26action=start&user=login_Fibaro&password=password_Fibaro&event=motionsensor&relaxation=120&subscribe=1
For example:
http://login_DoorBird:password_DoorBird@IP_address_DoorBird/bha-api/notification.cgi?url=http://IP_address_Fibaro/api/sceneControl?id=ID_scene_Fibaro%26action=start&user=INFO%40SMARTERHOME.SK&password=PASSWORD_FOR_FIBARO&event=motionsensor&relaxation=120&subscribe=1
Let me know if it helps, so we can help others 8-)
fi****** ****ri 28.12.2017
Hi. is possible have a tutorial for define la doorbird config inside fibaro hc2?Sm********* **am 02.01.2018
Hello,at the moment the tutorial is available in Slovak and Czech languages.
We are planning to translate it to the English. But for now you can just use google translator:
https://smarterhome.sk/sk/blog/integracia-videovratnika-doorbird-do-rozhrania-fibaro_96.html
Have a nice day.
SmarterHOME Team